Table of Contents
The main administrative tasks in the Pearl Comments system are:
- Creating and maintaining accounts for the people who have access to
the system.
- Creating and maintaining email notification information for the
people who wish to receive email when comments are added or
modified.
To perform these tasks, you must have access to a Pearl Comments
account that has been given the capability to manage other accounts.
The Pearl Comments Administration Interface is accessed using
a web browser. To access the interface, go to the Pearl
Comments administration URL provided by the person who installed
your Pearl Comments Server. Typically, the URL will look like:
http://hostname/pearlcomments/admin
Or, if you are using the Pearl Comments hosted service provided by
Pearl Crescent, it will look like:
https://use.pearlcomments.com/orgid/admin
(replace
orgid with the
Organization ID that was chosen when your Pearl Comments
subscription was created). After you connect to the
administration interface, you will be asked to authenticate by
providing the user ID and password for your account. If your
account has the ability to manage other accounts, the Accounts tab
will be shown and a list of accounts will be loaded.
Otherwise, you will be redirected to a page that allows any user of
Pearl Comments to change their own password (see the section
The Pearl Comment Password Change Interface
for more information). The initial view (with the Accounts tab
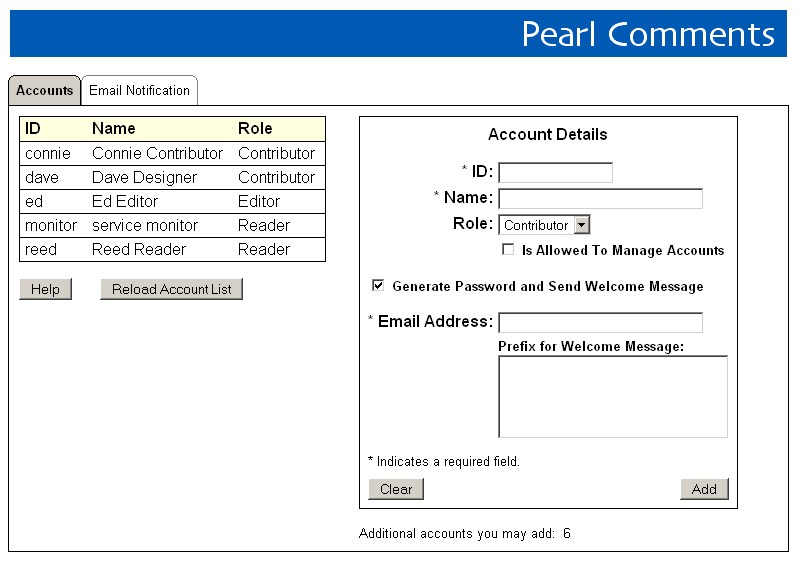
selected) is shown in Figure 1.
Figure 1: The Accounts Tab
The Pearl Comments Administration Interface is efficient and
easy to use. Dynamic HTML and Javascript are used behind the
scenes to avoid the need to reload the entire page. Here are
some usage tips:
- Two tabs allow you to manage accounts and email notification
information. Click on a tab label (Accounts or Notification)
near the top of the page to switch tabs. The label of the
currently selected tab is highlighted.
- On each tab, a list of current items is on the left side of
the page and an area to display item details is on the right side
of the page. To add a new item, provided the required
information and click the Save button or press Enter.
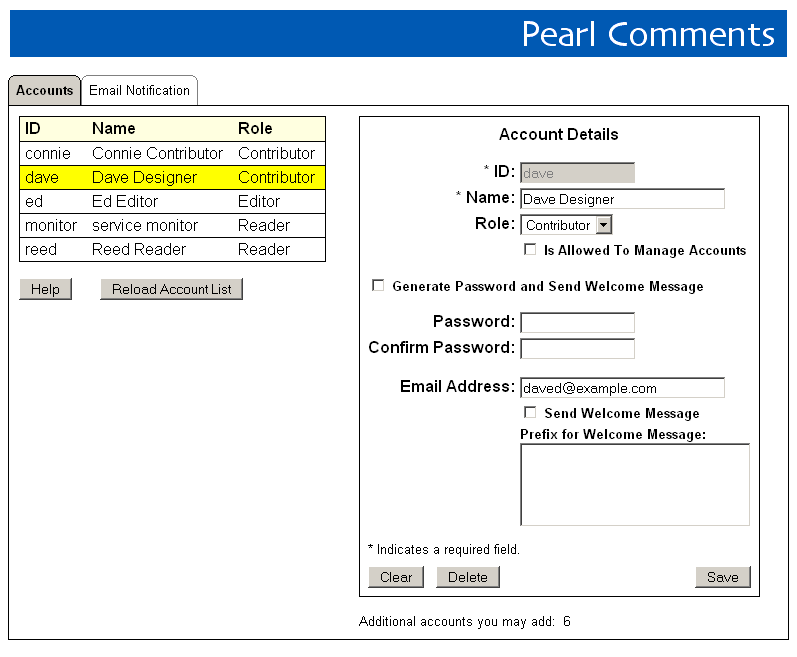
- To view detailed information for an existing account or email
notification record, click on the item in the list. The row
of the selected record is highlighted and all of the information
for the item is displayed in the details area on the right side of
the page (see Figure 2).
- When an existing item is displayed, you may make any desired
changes and click on the Save button to update the item. If
you change your mind and do not want to save your changes, click
the Discard button. The Delete button may be used to remove
an item.
The following two sections provide specific information on
managing accounts and email notification information.
Figure 2: Viewing Details for Dave Designer's Account
Use the Accounts tab within the Administration Interface to add,
modify, and delete accounts. The Pearl Comments server controls
access through the set of accounts that you define. Therefore,
you must create an account for each person who will use the Pearl
Comments system. When you create an account, you have the option
to send a welcome message to the account owner.
The following fields appear in the Account Details area:
- ID. A short user
name (e.g.,
jsmith) which is used to identify the
person.
- Name. The person's
full name (e.g., Jill Smith) which is displayed by the Pearl Comments
Browser Extension and other clients to indicate who added or who
modified a comment.
-
Role. Used to
determine what kind of access the person has to the Pearl
Comments system. There are three choices:
- Reader — May view comments only. No ability to
add, modify, or delete comments.
- Contributor — May view and add comments. May
modify and delete comments they added (i.e., their own
comments).
- Editor — May view and add comments. May modify
and delete other people's comments as well as their own.
- "Is Allowed To Manage Accounts"
checkbox. An indication of whether the person
associated with the account is allowed to add, delete, and modify
account and email notification information. Typically, only a
few people are given this capability.
- "Generate Password and Send Welcome
Message" checkbox. If checked, the server will generate
a new, random password and notify the person via email. This
checkbox is only displayed if you (the administrator) have stored an
email address for your own account and if the server is configured so
it can send welcome messages.
- Password. Used for
authentication. If the "Generate Password and Send Welcome Message"
checkbox is checked, this field is not shown. If your Pearl
Comments Server is configured to rely on the web server to authenticate
requests, this password field is not used.
- Email
Address. The person's email address (e.g.,
jsmith@example.com) which is used to notify them of the settings and
other information necessary to begin using Pearl Comments. This
field is optional unless you request that a welcome message be sent.
- "Send Welcome Message"
checkbox. This checkbox lets you control whether an email
message is sent to the account owner. This checkbox is not shown
if the "Generate Password and Send Welcome Message" checkbox is
checked.
- Prefix for Welcome
Message. A short personalized message that will be
included in the welcome message if one is sent.
To add, view, modify, or delete a comment using clients such as
the Pearl Comments Browser Extension both of the following criteria
must be met:
- The person must successfully authenticate by providing the user
ID and password for an account.
- The role assigned to that account must allow the requested
action. For example, someone with the role of Reader can't
add a comment. Someone with the role of Editor may modify and
delete any comment in the system. The actions allowed for each
role are summarized in Table 1.
| Action |
Reader |
Contributor |
Editor |
| View comments? |
Yes |
Yes |
Yes |
| Add comments? |
No |
Yes |
Yes |
| Modify and delete their own comments? |
No |
Yes |
Yes |
| Modify and delete other people's comments? |
No |
No |
Yes |
Table 1: Actions Allowed for Each Role
Use the Email Notification tab within the Administration Interface to
add, modify, and delete information that determines who receives email
about newly added or modified comments. The frequency that email
notification messages are sent is determined by the person who hosts
the Pearl Comments Server for you; typically, messages are sent once
per day. The Pearl Comments Server maintains "last notify" time
stamps so that each new or updated comment is reported once to the
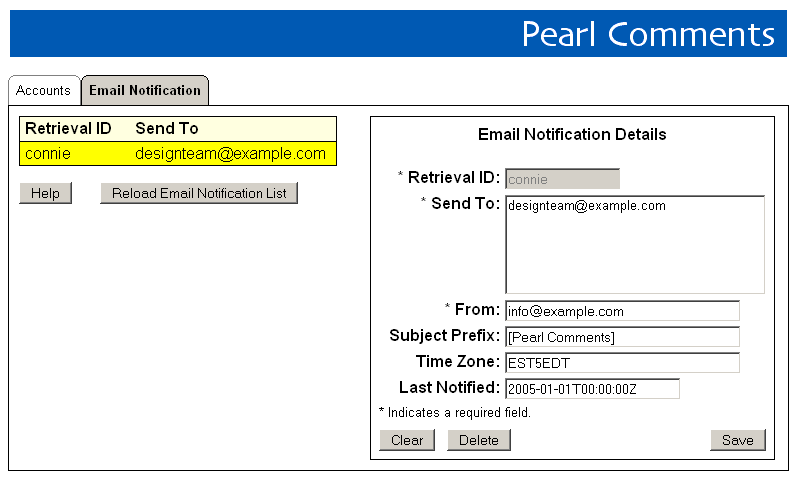
recipients. The Email Notification tab is shown in Figure 3.
Figure 3: The Email Notification Tab
You must create one email notification information record for each
recurring notification message you wish to send. For example,
if you have some people who want to be notified about new or updated
comments twice each day and others who wish to be notified only once
each day, you should add two notification information records (talk
to the person who hosts your Pearl Comments Server to arrange for the
notification messages to be sent according to a different schedule).
The following fields appear in the Email Notification Details area:
- Retrieval ID. A
user ID that identifies the Pearl Comments account the server will
use when retrieving information about newly added comments (see
the Managing Pearl Comments Accounts
section for information on adding accounts). Typically, you
will pick one user ID and use it to send email to several
people. For example, if jsmith, ajones, and jgarcia all want
to be notified at 5pm each weekday about new comments, you might
use jsmith as the Retrieval ID for a notification information
record that sends email to all three people.
-
Send To. The "to"
(destination) address for email messages. This can be a
single email address or a comma-separated list of recipients,
e.g.,
jsmith@example.com,ajones@example.com,jgarcia@example.com
-
From. The "from"
address that will be used when sending email, e.g.,
The Pearl Comments Server <pearlcomments@example.com>
- Subject Prefix
(optional). An optional prefix that will be included in the
subject of each email message sent.
- Time Zone
(optional). If present, the Pearl Comments Server will
adjust the dates and times included in notification email messages
to match a timezone that is different than the one the server
itself is in. For example, if your server operating system
is configured for U.S. Eastern time (EST5EDT) but you are
configuring notification for people who are in the U.S. Pacific
time zone, you would use a timezone of PST8PDT in the notification
record. The timezone value should be a string that is
recognized by your system; see the tzset manual page on your
system for more information (the timezone configuration database
is typically located under
/usr/share/zoneinfo on
Linux).
- Last Notified. A
time to be used as the starting point for notification (use the
format
YYYY-MM-DD hh:mm:ss). The first notification
message that is sent will include information about comments
made after this time, and the Pearl Comments Server will update
this field each time a message is sent. Note that this time
is expressed in Universal Coordinated Time (UTC), not in the local
time zone of your server.
The messages sent by the Pearl Comments Server are
HTML-formatted messages that contain, among other information, the
text of each newly added comment (as an embedded fragment of
HTML). The same precautions that apply when displaying any
HTML message in an email client are relevant. For example,
Javascript should be disabled in all email clients and you may want
to configure the email client software to display messages as
simplified HTML if that is an option.
To assist people who want to have their email client apply automated
filters to messages sent by the Pearl Comments Server, set the
Subject Prefix field of the notification information record to an
informative value, e.g., [Pearl Comments]. In addition, each
notification message includes a User-Agent message header which may
be used to detect messages sent by the Pearl Comments Server.
The User-Agent header contains the server name followed by the
version, e.g.,
User-Agent: Pearl Comments Server/1.0
To allow people to change their own Pearl Comments password, a
simple interface is provided which is accessed using a web
browser. Direct end-users to the password change URL provided by
the person who installed your Pearl Comments Server. Typically,
the URL will look like:
http://hostname/pearlcomments/admin/password
Or, if you are using the Pearl Comments hosted service provided by
Pearl Crescent, it will look like:
https://use.pearlcomments.com/orgid/admin/password
(replace
orgid with the
Organization ID that was chosen when your Pearl Comments subscription was
created). When someone connects to the password
change URL, they will be asked to authenticate by providing the user
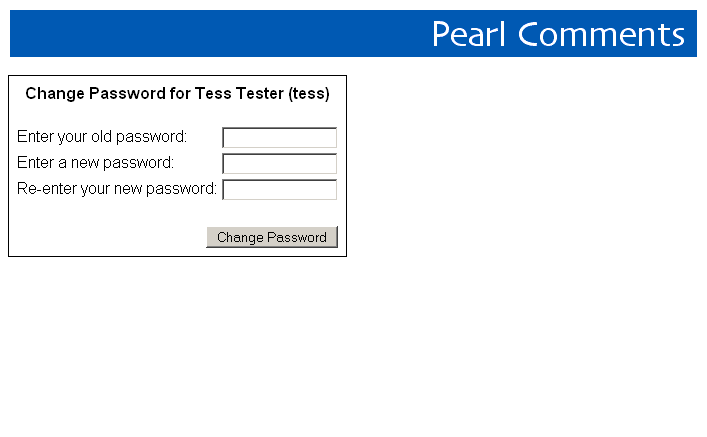
ID and current password for their account. A page similar to that
shown in Figure 4 will be presented.
Figure 4: The Pearl Comments Password Change Interface
Using the password change interface is straightforward; simply
provide the old and new passwords and click the Change Password
button. Note: If your Pearl Comments Server is configured
to rely on the web server to authenticate requests, the password field
stored with each Pearl Comments account is not used and therefore the
Pearl Comments Password Change interface should not be used either.
Revised 3-December-2007.